By Diana Troyk – MA3 President
The Desert Warriors of the Southwest Mounted Archery and a Chapter of the Mounted Archery Association of the Americas

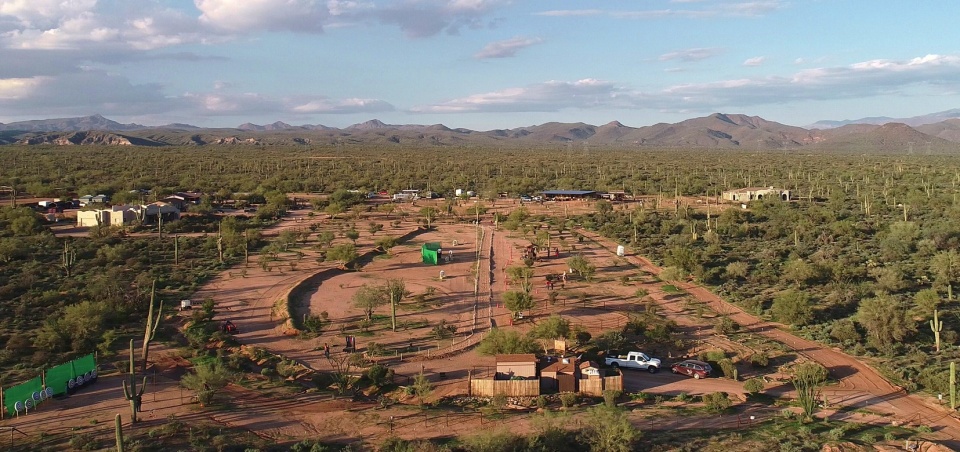
If you are fortunate enough to be able to purchase land, here are some ideas on how to set up your own horse archery course. First you should have an area that you can put in a straight track with a curve going into and out of. The best scenario would be to have 180 meters. This would give you a 90m track, 120m track and 150m track, with a 15m run-in and run-out. The 15 meters at each end would be with the curve. (Fig. 1)
The ground should not be too deep or too hard. A 6” soft base over a densely packed ground would be ideal. There many types out there, so investigate what is best for your area.
Barriers such as, poles or cones
- Traffic cones 24” or higher
- PVC poles 1-1 1/2” thick and 6’ long (2’ buried) with a T on top
- Step in poles with tennis ball on top
All barriers must have a T or ball top for protection of impalement. All roped between 8’-12’ set poles/cones must have a breakaway point between each pole/cone. There are many styles of mobile targets that can be used for all the different type of events. It is nice to either cover, turn away or remove targets that are not needed for each event. The Hungarian tower is a different type of structure. Again, there are many out there made of many different things. Steel poles can be made into a large T with shelfs to hold the 3 targets. Again, the base can be permanently placed with the targets able to be removed or replaced, but if it is metal then it either needs to be wrapped with rubber (anything that will stop arrows without breaking them) or a wood structure covered in rubber.

The target back drop is not mandatory however if you want to find most of your arrows it is a really good idea. Archery netting is the best way. The best netting is done in 4 sections. It should be 10’-15’ behind the Hungarian tower and then angled out on the sides to be 10’- 15’ from the forward and back shots. five, 10’-15’ 6×6 (preferably wood) poles would be placed 20’ apart with one being in the center of the Hungarian tower, one 20’ on each side of the center, then one on each side angled 20’ from the forward and back target. These poles should have a hole thru the top for a strong steel pole to go thru for each of the 4 sections. Secure the poles on top of the 6×6’s so they will never move or put them thru a hole with a bolt thru it so it cannot side out. (Fig. 2)
Rope can be any size but be sure the horse can see it.
- A different color must be used for the first and last 15m than the main track
- A strong but bendable wire should be wrapped around one end of the rope with a loop and the other end of the rope should have a piece of wire wrapped with a piece to go thru the loop and bend This way, it will hold the rope well but come apart if a horse goes thru it.
- These breakaway points should be in the middle of each Burn or glue ends of rope to stop fraying.
- If using cones, you can use any type of line with a weight on the end to put down thru the hole in the top so each section would be able to come With cones you do not need a line between each one if not needed. (Some horses might go over or thru them).
- Rope, with wire twisted in a loop & with hook. Hook should not be able to catch on anything. (Fig. 3)
- Make the track wide enough for your grader or tractor to go down in order to keep track graded.

There are different type of stands to use for your targets if they are the mobile type. You can use straw bales, however over time these become a haven for critters and loss of straw. A strong metal pole with a heavy base (wheels on one side are nice for mobility) that you can put your target on. Be able to swivel it. Wrap the base with something like rubber to protect low arrows. Now you can add strong rings to the top of the poles (like a shower curtain). Put a strong clip onto the grommet of your four, 20’ nets and clip to the rings. This will help you pull them back and forth. Next, put a large eye bolt at chest level and ground level on the back side of each pole and a grommet at the same level on the nets on each side so you can clip the nets to the eye bolt. Now, you can pull them open and secure them.
When not in use, you will want to close them because of wind. Once closed, use strong rubber bungee cords (4), 1 each, to tie around the netting. If looking at your Hun target you have the 5 poles, number them 1-5 starting on the left at the forward shot. The first two nets on the left go to the #2 pole and wrap as one with the bungee cord. The two on the right go the #4 pole and wrap.

Netting setup
The Hungarian tower, Korean forward shot, middle shot and back shot. All 10’ from netting. #3 pole should be 10’ from the Hungarian Tower set in the middle. (Fig. 4) Have an area at each end (remember, everything must be equal for right and left-handed archers), to put a number of buckets or large 5” x 2’ PVC poles to hold arrows. Also, something to hold bows. A stand that can be used for mounting with a wall holding the PVC tubes and hooks for the bows works well. Along the course, it is nice to have a few arrow holders 10’ back from the track. This is so when the arrow runners retrieve the arrows, they can be put them into the holders for the archers coming back down after their run.
For the Qubaq, you can use different types of pole stands, however, be aware of the wind.
Get a 2’ piece of I beam and weld a 2 fi2 ’ steel pole(whatever size your flag pole is), to the middle. Bury it in the middle, at the edge of the track with only 3” showing. You can cap it when not using it. If the pole is too small get a piece of PVC pipe to fit into the stand that your pole will fit into. For mobile Qubaq stands, do the same as above but have the welder put a hole in each end for large metal spikes. This way you can move or travel with your pole and stand. Have a short sledge hammer to put spikes into ground and a wrap cord to pull them out. These are great for wind as the stand is heavy and strong.

Qubaq stands
Turn flat and weld a pole in the middle. I beam is 2’ long and steel pole 2’ long. (Fig. 5) A collapsible flag pole is the best since the ball at the top holds the disc on well, (never tighten the disk as it needs to move up and down an inch or two so you will not break your arrows). This way you can put it into your stand already raised up 2/3 notches then lift up each notch from there. Easy.
The disk on top can be anything round. However, I have found that a cymbal is the best as it has a concave part at the top to keep the cymbal resting flat. Also, the sound is so rewarding to hear when hit it with an arrow. They are not inexpensive but worth it, as they last a long time. Some come in different colors like, Gold, Bronze, Red, Blue and Purple. The Ranking/scoring one need to be 16’ in diameter. But you can do a variety if having fun with your event and do 2 others.
- Have the archery area clear of debris such as bushes, logs, etc. and mow any grass. If you have grass, invest in a metal detector as many arrows are lost sliding under the grass and cannot be found.
- Have an area near the start of the course but not near enough to be distracting for practice. You can build a long stand for 4 or more targets or have wooden tripod stands for each target. Remember to cover any metal, and you should place netting behind. 2 poles with a 10’ by 20’ net works well.

It is mandatory to have a designated area, 15’ from the track for scores, judges and spectators in the middle of the track. Place any kind of barrier to stop public from getting too close to the track but allow the arrow runners and judges access.


TIPS
The best archery netting is the green, Bear Paw netting at Kustom King Archery. It lasts longer than any other. Sizes range from 10’ x 20’.
Targets are the 80cm for the Korean and 90cm for the Hungarian. You can find them at Rinehart Archery (Genesis Youth targets). They are the round rubber, long lasting targets, expensive but worth it.
You can fill the holes with foam calk, then sand and repaint with Valspar rubberized paint. They will last a very long time.
For practice targets, you can get the square Morrell Youth archery targets at any Bas Pro or Cabela’s, very reasonably. They are not waterproof but light weight to bring indoors.
For the 90, 120 & 150m courses, if you have a 90m course, place your Hungarian tower in the middle at 45m from the start pole. You can do it for each of the length courses you have by placing the tower in the middle. That way you have a longer track in and out if using the 90m event on the 150 course. Always have the tower in the middle of which ever course your using. If you have a 150m track, place the Nun tower at 75m from the start pole. If doing the Nun or Korean events, it makes it fair to both right and left-handed archers. You can always move the timers to accommodate which ever track you are using for that event. That way the middle is always even on all tracks.
Have a bulletin board near your course for Track events, Competitions and Postal Matches, along with any news or special announcements. LWAYS have your course posted with your State Law notices and Equine Warnings.
These suggestions are my own as to what I have found to be the most appropriate, safe and affordable.