 By Laurie Harris
There are many reasons why a sawdust (or wood shavings) compost outhouse would make a great consideration for your farm or ranch. Whether you host events and may be looking for ways to accommodate guests, or merely could benefit from the advantages of an extra toilet in various locations of your farm or ranch, a sawdust compost outhouse serves brilliantly. Not only is the notion of a nicely designed outhouse a pleasantly nostalgic experience for guests, family or employees, it is odor-free and environmentally friendly. There is no need to dig a pit, thus, your outhouse can even be built on skids so that you would have the ability to drag it to various locations depending upon your needs at the time.
What’s up with the sawdust?
Sawdust creates a system of layers, you’ll start your clean, empty bucket with a layer of sawdust about 2-3″ deep. After each use, an new layer of sawdust is used to cover the human waste. The process continues in this fashion layer after layer until the bucket is full. At this point, replace the full bucket with a clean, empty bucket with the same initial layer 2-3″ sawdust, and begin again. The sawdust serves as a composting agent, it prevents odors when waste is properly covered, and serves to detract flies and other insects. This way, your outhouse will be hygienic, clean and sanitary.


The Compost Pile
We created 3 compost bins out of wood pallets, forming them into boxes without bottoms. Layer the contents of your buckets with straw or grass clippings into your compost bins. Allow your compost to cure for a year prior to use. There are some who use humanure compost for edible gardening, but for us we use it for flower beds and filling holes around the farm. If you have an interest in creating compost suitable for edible gardening, or would simply like to learn more about the process, there are plenty of references available on the internet. One good source is The Humanure Handbook.
Insects
As previously mentioned, flies are not an issue with a properly used sawdust compost toilet. In fact, the only issue we’ve had with insects were wasps building nests inside. We resolved this initially by setting off an insecticide bomb at the beginning of each ride season and removing the nests. However, we did not use the outhouse until later in the season one year, and were surprised to discover a wasp nest the full circumference of the bucket, under the toilet seat! Thus, we discovered how important it is to seal any cracks or openings and to cover the moon windows on each side with screen. Even then, it’s good to check for wasps often.
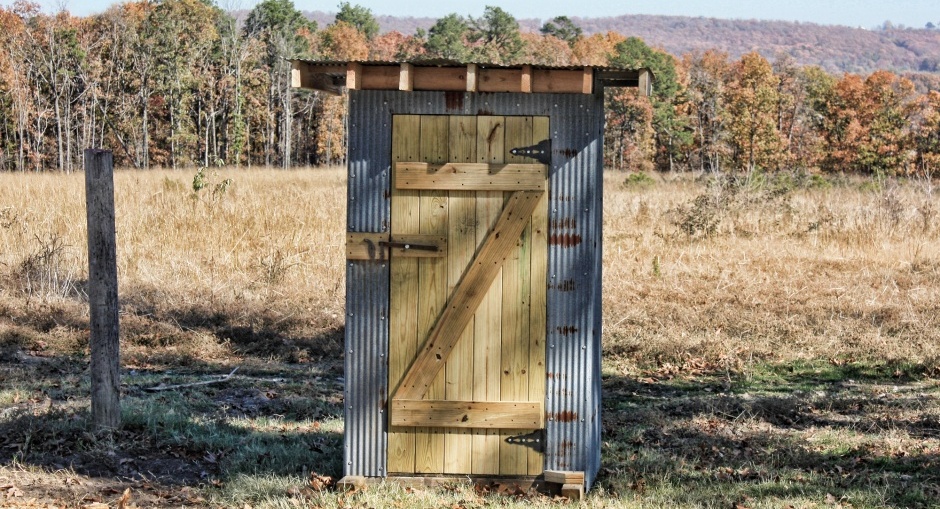
Features
We desired an outhouse that would fit into a rustic, western theme and designed it thusly. You can always do an internet search and find a variety of styles and designs that suit you. Inside, we built a bench. The bench top is hinged so the entire top can be opened. Fitted into the top is a toilet seat and a wood lid. The wood lid provides access to a bucket filled with clean sawdust for use in covering waste as needed. There is enough space inside for a third bucket, which we found handy to have when hosting ride events. We could easily replace the filled waste bucket with the standby bucket, so while emptying the filled bucket the restroom could remain open and accessible. We also provide wet wipes for hands, and of course toilet paper. The hooks on the inside of the door are handy for hanging coats or whatnot, but we discovered that by hanging a windup camp lantern that there would always be an extra source of light available. In addition to the lantern, we strung solar Christmas lights inside, and placed the solar panel upon the roof of the outhouse, illuminating the outhouse throughout most of the night.
You will want to search out the most easily bio-degradable paper products for your outhouse, as they will be incorporated into your compost. Another tip we learned is that in addition to having a lock on the inside of the door for privacy, you will want to install a lock on the outside as well. The reason for this is strong winds can force the door open and could potentially cause damage.

The outhouse was fitted with skids made of 4×4’s, with holes drilled into each one to accommodate a tow rope if moving may be needed. The entire outhouse can be dragged with a truck or tractor. Also notice the door stop on the right skid to prevent the door from slamming open too far, as well as the lock on the front to keep the door securely closed when not in use.